Mixed Media Scripture Art Cards
"For the word of God is alive and powerful. It is sharper than the sharpest two-edged sword, cutting between soul and spirit, between joint and marrow. It exposes our innermost thoughts and desires" (Heb 4:12 NLT).
Jan Paron | December 11, 2014
One of my church's ministries plan to distribute Scripture cards to those of whom they serve this Christmas. We wanted something bright and beautiful that would feature the Gospel message as a keepsake. Our goal is to have the Word penetrate their hearts long afterwards. So, we came up the idea for Scripture cards that I would make on the order of a mixed media journal page.
Since I have a short timeline in which to create them, I needed a quick and easy method. Additionally, I wanted durable cards that lend cross-cultural appeal. You can view a few samples from the Scripture card collection below. Scroll down for directions on the Calvary Set (top card).
 |
| Calvary Set Jan Paron, Copyright 2014 |
 |
| John 3:16 Set Jan Paron, Copyright 2014 |
 |
| Salvation Set Jan Paron, Copyright 2014 |
Method for Calvary Set
Materials
- Basics: School glue, 3" x 5" index cards, small mist water bottle, old magazine, baby wipes, wax paper, makeup wedge, Soffit sponge bar and cover (or Q tips); hot glue or super glue, expired plastic card (like a bus pass)
- Paint: Pebeo Studio Acrylic dark cadmium yellow, neon orange, violet blue florescent and silver iridescent; Plaid acrylic baby pink, pink, bright red;
- Gel Mediums: black gesso; light modeling paste, Golden Polymer Medium Gloss, Mod Podge Sparkle;
- Embellishments: pie tin
- Stamping: Color Box Pigment Stamp Pad magenta and frost white; Scripture Stamp
- Gelatos: red;
- Inks: Daler Rowney ink flame orange, Dylusions funky fuschia, postbox red, and bubblegum pink ;
- Pens: Bic Mark It, fine; Uni-ball Signo broad;
- PanPastel: Red and dark red;
- Stencils: One large with circles, bubble wrap.
Method:
STEP 1: PREP THE INDEX CARDS
Prepare your index cards by gluing three together. Flatten each card layer with an old plastic card of some type. Place them in between sheets of wax paper, and weigh them down with a book
 |
| Step 1 Prep the Index Cards |
Step 2: ADD UNDERPAPER
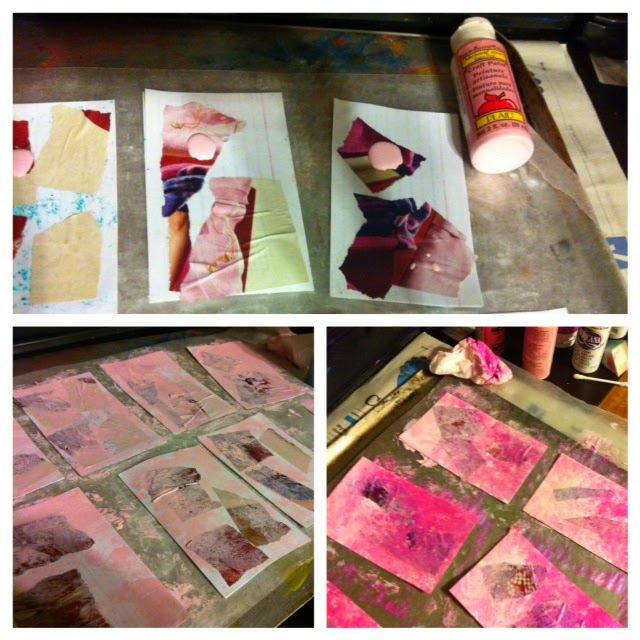
Tear up pieces from a magazine or catalog that go with your color scheme. Squeeze glue and mist water onto the index card. Lay the magazine strips down. Squeeze more glue on top and even it out with a paint brush.
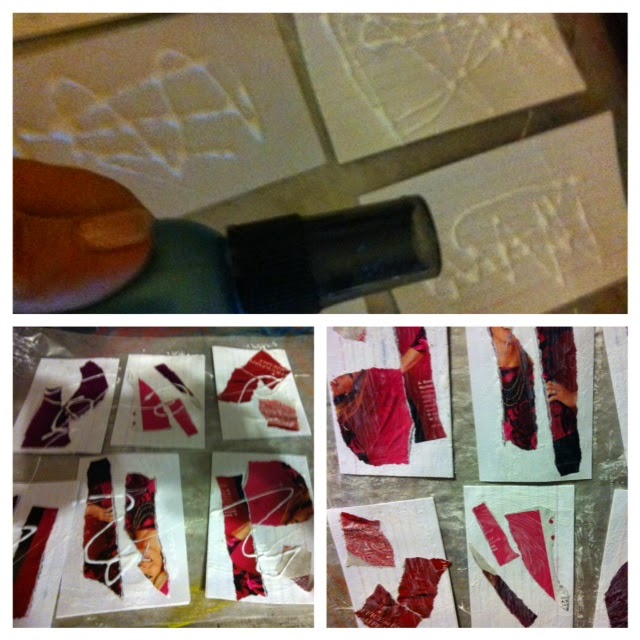 |
| Step 2: Add Underpaper |
STEP 3: PRIME THE CARDS
Prime the cards with baby pink and pink. Light at the top right corner and dark at the bottom. I use a baby wipe to move the paint around. Don't cover up all the underpaper when you paint. You want some of it to peak through for the card design.
 |
| Step 4 Prime the Cards
|
STEP 4: LAY THE STENCIL
After you spread your paint, blow dry it. Lay down your stencil and apply it with a dry makeup wedge by dabbing the paint. Hold the stencil taut around the area you work so paint doesn't leak underneath. Before you remove it, press a sheet of bubble wrap over to texturize the paint. Gently lift up the stencil when you finish. I hold the bottom of each card with one hand and the stencil with the other. Dry it afterwards. Hold each card to the dryer, rather than point the dryer down to the cards.
Note: I stenciled one half of the cards with the positive image and pressed the negative (flip side) to the other half.
 |
| Step 4: Lay the Stencil |
STEP 5: SPRAY INK
Spray two different inks (postbox red and funky fuchsia). I sprayed the ink on the makeup wedge and gently tapped it on the card. I applied the inks to the set with the positive stencil image to tone it down a bit. A little ink goes a long way.
 |
| Step 5: Spray Ink |
Step 6: STAMP SCRIPTURE
Stamp the set with the positive stencil image in white and the other magenta. Dry thoroughly.
 |
| Step 7: Stamp Scripture |
Step 7 ADD CROSS AND HILL
Cut strips of aluminum from a pie tin. The vertical should be twice the length as the horizontal. I ended up gluing my down with hot glue. The strips defied every other type of adhesive I had. Paint black gesso underneath it in a shape of a hill. Dry it again.
 |
| Step 8: Add Cross and Hill |
Step 8: Enhance Cross and Hill
Apply modeling paste over the hill with a smaller circle stencil. I painted bright red to the stencil first and dried it a bit so the red mixes in with the modeling paste. Spread the paste in a thin coat over the stencil. Hold the stencil taut as you layer the paste over it. If some paste oozes underneath, don't worry about it. You can cover it up with a black marker later.
Outline the cross with black marker and hill with white. Paint the modeling paste dots in a bright red. When dry, dot each with Mod Podge sparkle. I added just a touch of cadmium orange to the larger dots after the Mod Podge dried.
When all this dries, apply Pan Pastel red around the cross area and dark red to the left of the hill at the bottom. (I either use the Soffit sponge bar or a Q tip with the PanPastel.) Then, outline the hill with neon orange.
 |
| Step 8: Enhance the Cross and Hill |
STEP 9: FINAL TOUCHES
Outline the edges of the card with red gelato and smooth it with your finger. I dribbled some flame orange ink and neon orange acrylic over the red on the card set and neon orange over the other.
I drew on the message with a Mark it pen in a large font because many who read our cards have low vision. Then, I'll type a Scripture, the ministry address, and contact information and add it to the back.
Next ,apply the gel gloss either with a brush or your finger. Dab it so you don't smear anything. When it dries, flip the card over and spritz ink on it. (I set the cards in a box when I spray ink).
The final step is to punch a hole at the top middle and string through ribbon.
 |
Step 9: Final Touches |
NOTE: PLACE SOMETHING HEAVY ON TOP OF YOUR CARDS FOR SEVERAL DAYS TO FLATTEN THEM!


These are beautiful. You are an amazing blessing for doing this for so many.
ReplyDeleteBlessing hugs,
Teresa
Teresa, thank you so much. Using art to spread the Gospel is another way to reach people. Many need a visual as a bridge to the meaning making process. Let God's Word go forth exceedingly to build His Kingdom! Blessings, Jan
ReplyDeleteThese are so incredibly beautiful.
ReplyDeleteThanks, Kathy! I find art such a deep expression of worship. When I create the cards, I can see and feel what actually occurred. I love the Lord even more when I stand back and realize what He did for us!
Delete