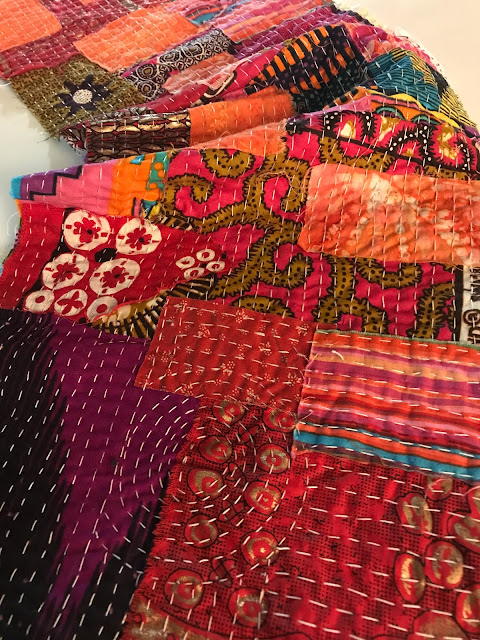
I love the look of the stitched fabric length. The finished piece looks rich, almost seamless as one piece.
The fabric presented several challenges while sewing. First, the wax coating and gold pattern made it difficult to push through my needle. So, I worked with a more pointed and longer needle and lengthened my stitching. That solved the problem.
Also, the new blue masking tape that served as a line guide didn't stick as well as the one I had. In turn, it resulted in many errant stitches. I restitched portions of rows and finally decided to work freehand.
Every fabric piece has its own properties. I generally have to make adjustments to my stitching. Have patience. Cover up the stitching you don't like with embellishments if all else fails.
Materials
- Stitched fabric top
- Backing such as felt or other soft material
- Cotton or wool stuffing
- Thread
- Sharp scissors
- Long, sharp needle (Not too thick)
- Material for embellishments (I'll show how to create simple flowers in a different post.)
- Wood skewer, tweezer, self-locking hemostat scissors
Creating a Large Heart
Step 1. Create and Lay Out the Heart Pattern
I use a paper bag for the main pattern. My heart has undergone several revisions, from narrow to a wider version. It currently measures approximately 4 1/2" x 5 1/2"
Lay the pattern out as desired. I placed all mine either horizontally or vertically to the stitching. Maneuver the pattern around to squeeze as many hearts as possible from the fabric piece.
For the back side of the heart, select fabric that holds up to the stuffing yet allows for any easy entry for your needle. I am plan on cutting up an old tablecloth since it picks up the red and orange in the main fabric piece.
Step 2. Cut Out the Heart Pattern
To prevent slippage, I inserted more straight pins into the fabric than usual. Take your time cutting, especially around the curves.
Cut one heart from the stitched material and another from matching fabric.
The stitched material yielded six heart toppers, one bird, and leftovers for smaller heart projects. Keep all the scraps!
Step 3. Sew and Stuff the Hearts
Make sure you line up the top fabric with the underside. Sometimes the underside shifts! To prevent slippage, insert more straight pins into the material than usual.
Sometimes I baste the two pieces together with a small backstitch on the top side and a slightly longer stitch on the underside. Then, I stitch on the sew line, and leave the basting stitches for extra strength. I probably will baste this one since the fabric has a slick feel.
Cut a pattern piece 1/4" smaller than the regular pattern to use as your stitch guide. You either can draw your line in with a quilting pencil or sew on the inner pattern edge. I sew around the inner pattern edge.
You can hand or machine sew. However, I prefer by hand so I can control the curve.
Stitch with the right sides together. If you want to add a thread hanger, pin it to the wrong side before you sew.
Leave a 1/2" to 1" opening on the side so you can turn it wrong side in. I use tweezers to pull the fabric through the opening.
Before you turn it right sides out, notch the curve. Add a slit to the inner point and clip the bottom. I trim the top fabric near the sew line to remove bulk.
Sew up the opening with a hidden stitch taking care to keep to the curve.
Take your time stuffing. You want a smooth finish rather than lumpy. Wood skewers for shish kebob work well in pushing the filling into the corners. Tweezers and self-locking surgical scissors will move the stuffing around.
Step 4. Finishing the Heart
Sometimes, I have to pull out stubborn material pieces in the curve with tweezers. Also, you still may have to push stuffing from the outside to the middle to the heart puffs up. You'll know what looks good to the eye.
See the sewn heart above. You can add embellishments or leave it plain. I usually enhance the top fabric. I let it sit a bit before I decide about the design.
Questions? Please post in the comment box for assistance.
Step 5. Pray Over the Heart
When you finish, pray over the heart. Ask the Lord who should receive it. Once I know the person, I ask for their prayer request. I add that name to a log and pray daily.'
God bless the works of your hands!
Jan Paron, PhD
January 7, 2022
"For though we walk in the flesh, we do not war according to the flesh. (4) For the weapons of our warfare are not carnal but mighty in God for pulling down strongholds, (5) casting down arguments and every high thing that exalts itself against the knowledge of God, bringing every thought into captivity to the obedience of Christ, (6) and being ready to punish all disobedience when your obedience is fulfilled" (2 Cor 10:3-6 KJV).


Comments
Post a Comment