Journal Page Preparation
As every man has received the gift, even so minister the same one to another, as good stewards of the manifold grace of God (1 Pet 4:10 KJV).
Jan Paron | June 30, 2015
Scripture art journaling presents many options to represent the Word through mixed media. Some may view it as difficult or costly. Art journaling need not be either. Simple directions, household materials, and teacher support open access to the process.
In the upcoming weeks, I'm going to post an art journaling how to series. The series will present foundational strategies using local or inexpensive materials. If you don't understand something, please don't hesitate to ask me a question in the comment section. Today, I begin with the first step, preparing a journal page.
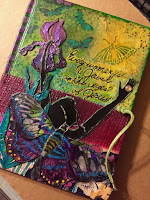
The adage "a picture is worth a thousand words" holds true with art journaling. For some, an image says more than words or gestures. I encourage you to learn art journaling to develop another language to convey Scripture. Below you'll find a sampling of my recent works, all for the purpose of spreading the Gospel through the visual arts.

So, start painting for Jesus! In my next post, I'll show you how to create a journal page based on Rom 12:1. The journal delves into Rom 12 along with Chip Ingram's book, Becoming a Romans 12 Christian.


Jan Paron | June 30, 2015
Scripture art journaling presents many options to represent the Word through mixed media. Some may view it as difficult or costly. Art journaling need not be either. Simple directions, household materials, and teacher support open access to the process.
In the upcoming weeks, I'm going to post an art journaling how to series. The series will present foundational strategies using local or inexpensive materials. If you don't understand something, please don't hesitate to ask me a question in the comment section. Today, I begin with the first step, preparing a journal page.
The adage "a picture is worth a thousand words" holds true with art journaling. For some, an image says more than words or gestures. I encourage you to learn art journaling to develop another language to convey Scripture. Below you'll find a sampling of my recent works, all for the purpose of spreading the Gospel through the visual arts.

Journal Cover

Bookmark
So, start painting for Jesus! In my next post, I'll show you how to create a journal page based on Rom 12:1. The journal delves into Rom 12 along with Chip Ingram's book, Becoming a Romans 12 Christian.

Becoming a Romans 12 Christian
Lesson 1: Art Journal Page Preparation
Materials
- New journal, old book, loose-leaf paper, catalog, spiral notebook, composition book, or printed material -- Choose a size that works with your hands.
- 1-2 parts water to 4 parts school glue -- Shake in a glass container
- Glass container for your glue mix
- Any type of oil to rub around the lip of the glue jar to prevent the lid from sticking
- A used plastic card
Video
My first videos: Be patient with me! I'll post a better time lapse next time.
Tips:
- Your glued/gessoed pages will curl under as you dry them. Not to worry. Place a sheet of wax paper over the prepped page, and then a stack of books on top of it. I let mine sit overnight. For smaller sheets, I flatten them with a leaf press.
- If you dry each page set, you can prep several at one time. I usually do about five sets of pages at a time. Just make sure you placed wax paper in between each prepped page so they don't stick together. Even when you blow dry a page, it still needs additional drying time.
- You will notice that the dried, prepped pages have ridges and creases in them. Let these become part of your design. Sometimes, I use an extra heavy gesso and partially fill in the ridges and smooth out the creases. Other times, I don't use a fill. Patterns often emerge from the ridges and creases. I show an example below of how to work the paint with the ridges.

See how the design from the ridges emerged once I painted the page?


Comments
Post a Comment